
If you’ve ever run a Java program and seen “Error could not create the Java Virtual Machine,” you’re not alone. This vague message appears in many Java apps, from Minecraft to Eclipse to the Arduino IDE, and means Java failed to start its engine (the JVM). Java couldn’t launch its virtual machine, so your program stops immediately. It’s frustrating, but the good news is that this error is usually fixable. Java is everywhere; nearly 99% of companies use it, and about 30% of developers code in Java so knowing how to fix this is helpful. Next, we’ll explain what causes the error and share 7 easy fixes to get you back on track.
This issue often leads to the message: Error Could Not Create the Java Virtual Machine. Many users experience it across different platforms, reinforcing the need for clear solutions.
Let’s start by clarifying what this error actually means.
The error message Error Could Not Create the Java Virtual Machine often leaves developers puzzled, as it doesn’t specify the root cause.
This error means that Java failed to start the Java Virtual Machine (JVM), which runs Java programs. If it won’t start, nothing runs. The message “Could Not Create the Java Virtual Machine” is generic; it tells you Java couldn’t create a VM, but not why.
In simpler terms: when you launch a Java app (say, by double-clicking a .jar file or starting an IDE), Java tries to allocate memory and initialize the VM. If it hits a problem (like bad settings or missing files), you’ll see something like:
Ultimately, resolving the Error Could Not Create the Java Virtual Machine involves understanding Java’s memory requirements.
Error: Could not create the Java Virtual Machine. Error: A fatal exception has occurred. The program will exit.
When troubleshooting, keep in mind that the Error Could Not Create the Java Virtual Machine message can arise from various issues, including memory allocation problems.
If you encounter the Error Could Not Create the Java Virtual Machine, try adjusting your Java settings before diving deeper.
Frequent users may wonder why the Error Could Not Create the Java Virtual Machine message appears and how to prevent it in the future.
This error stops the program. Causes include typos, low memory, or corrupt installs. Java crashes before starting.
Many developers describe this as the Java VM refusing to start. It can happen when launching any Java-based tool on Windows, Mac, or Linux. For example, Arduino users see it at startup, and Minecraft players see it when the game can’t allocate enough memory. The key point: it’s an initialization failure; something prevented the JVM from starting.
Common Causes of Java Virtual Machine Launcher Error
Several issues can trigger this JVM launcher error. Here are the most usual culprits:
Incorrect Java Heap Size Settings
Java uses a memory area called the “heap” to run your programs. The -Xmx setting determines the maximum heap size. If this value is set too high (or too low), Java might not reserve that space. For example, if _JAVA_OPTIONS or a launch config uses -Xmx2G on a system that can’t provide 2 GB at startup, you’ll see an error like Could not reserve enough space for object heap. In short, over-allocating memory makes Java stop. We’ll cover how to adjust the heap size below.
Outdated or Corrupted Java Installation
If your Java installation is damaged or mismatched, the JVM may fail. Possible issues include an incomplete install, an interrupted update, or incompatible versions. If the date was interrupted or a mix of 32-bit and 64-bit Java is on the same PC, the JVM can’t launch. Also, if Java isn’t in the PATH or you have multiple versions, the wrong one might be called, causing an error. In short, bad installs or mixed versions often cause this issue.
Wrong Environment Variables
For many, seeing the Error Could Not Create the Java Virtual Machine is a telltale sign that something is wrong with their configuration.
Environment variables like JAVA_HOME, PATH, and _JAVA_OPTIONS affect the JVM. If JAVA_HOME points to the wrong directory or PATH uses an old Java version, Java won’t start. If _JAVA_OPTIONS includes a bad value (like -Xmx2G on 32-bit systems), Java fails. We’ll show how to fix these settings next.
32-bit vs 64-bit Java Conflict
Windows and Java both come in 32- and 64-bit versions. If your system is 64-bit but you install 32-bit Java, the JVM hits memory limits near 1.4 GB. Running 64-bit Java on a 32-bit OS doesn’t work. Use the Java version that fits your OS and hardware. We’ll show details in Fix #5.
Arduino IDE Configuration Issues
This one is specific to the Arduino IDE, which many hobbyists use. The classic Arduino 1.x IDE bundles Java and uses the arduino.l4j.ini config file. If this file has the wrong memory setting (not the default -Xmx512M), or if your system Java overrides it, the JVM won’t start. Arduino’s documentation notes that a corrupted IDE folder or conflicting system Java settings can cause this error. If you see this in the Arduino IDE, read Fix #6 (and consider upgrading to Arduino IDE 2, which avoids Java).
Knowing the steps to rectify the Error Could Not Create the Java Virtual Machine can save you time and frustration.
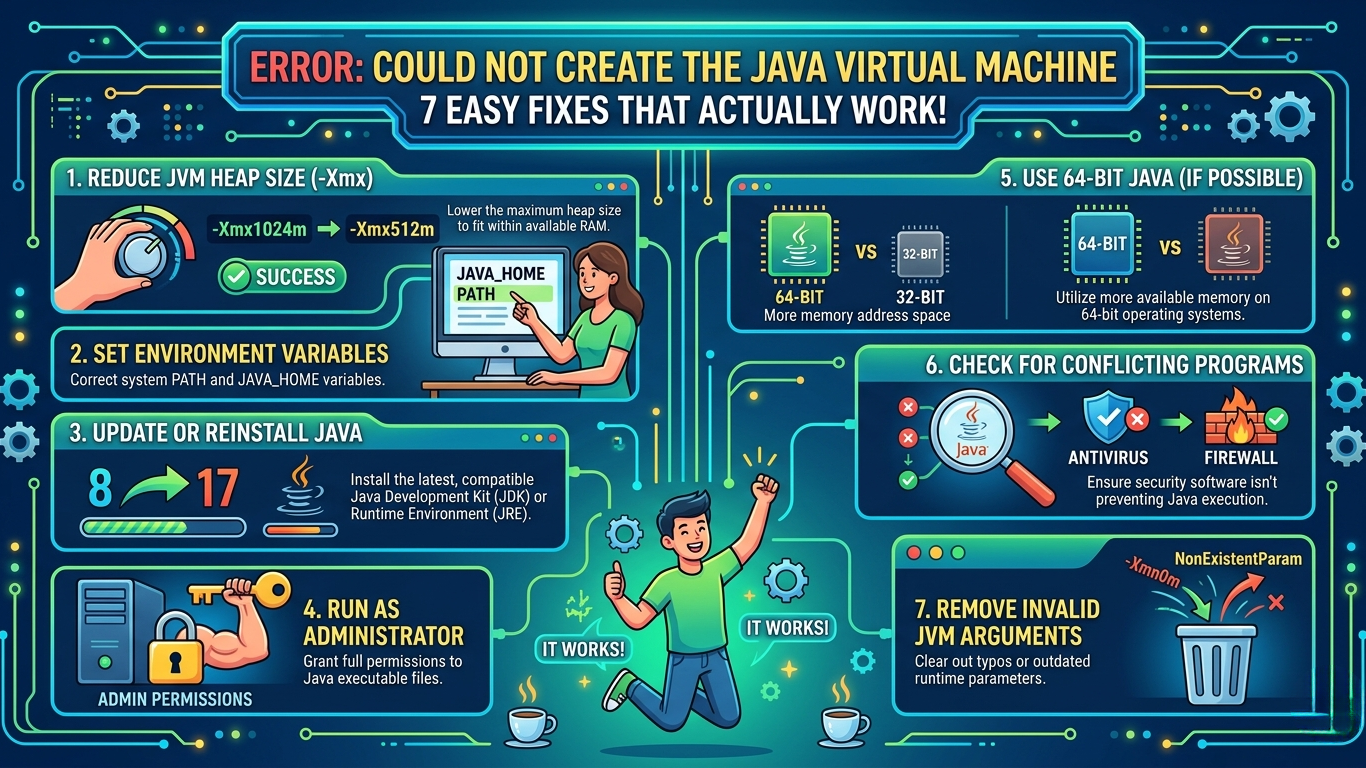
7 Easy Fixes for “Error Could Not Create the Java Virtual Machine.”
Here are seven practical solutions. Try them in order, usually, one or two will solve the issue.
Fix #1 – Adjust Java Heap Size
Often, the simplest fix is to reduce the maximum heap size Java tries to allocate. If you have a very high -Xmx value (like 2G or more), dial it back. Here’s how on Windows:
- Press Win + Pause/Break to open System Properties (or go to Control Panel ▶ System).
- Click Advanced system settings, then Environment Variables
- Under “System variables”, click New.
- For Variable name, enter _JAVA_OPTIONS. For Variable value, enter -Xmx1024M (or lower, e.g., -Xmx512M).
- Click OK to save.
This sets a global Java limit. For example, -Xmx1024M caps Java’s heap at 1 GB. Many users find that reducing from 2G to 1G fixes the error. If you have more RAM (8+ GB) and still want 2G, try -Xmx1536M or -Xmx1024M first.
Alternatively, if you launch via a shortcut or script, you can add -Xmx directly, e.g.:
Before moving on, ensure you’ve addressed the chances of encountering the Error Could Not Create the Java Virtual Machine in future projects.
java -Xmx1024M -jar MyApp.jar
This specifies a maximum heap size of 1 GB for that run. The main point is to ensure Java’s maximum memory doesn’t exceed what the OS can provide at startup. If you see “Could not reserve enough space for object heap”, lowering -Xmx usually solves it.
Fix #2 – Reinstall Java (Clean Install)
If memory tweaks don’t work, a fresh Java install can fix corruption or version conflicts. Do this:
- Uninstall existing Java: Go to Control Panel ▶ Programs and Features, uninstall all Java/JRE/JDK entries.
- Delete old folders (optional, though thorough): Remove C:\Program Files\Java\ (and C:\Program Files (x86)\Java\ on 64-bit) if they remain.
- Download the latest Java: Go to Oracle’s site or OpenJDK and get the current JDK for your OS. (For Windows, use the 64-bit installer if you have 64-bit Windows.)
- Install Java: Run the installer.
- Verify installation: Open a new Command Prompt and run java -version. You should see the updated version.
Reboot after installing. This ensures Java isn’t corrupted or mismatched. If Java launch failures were due to a bad install, this fix often helps.t.
Fix #3 – Check Environment Variables
Make sure your system environment variables aren’t causing trouble. Specifically, check:
- JAVA_HOME and PATH: Java’s bin directory should be in your system PATH. For instance, if Java is in C:\Program Files\Java\jdk-22.0.2\bin, that path should be in PATH. Also, if you use JAVA_HOME, it should point to the Java folder (without \bin).
- _JAVA_OPTIONS: As mentioned, if set too high (e.g. -Xmx2G), it can override app settings. Remove or edit it. To do this:
- Open System Properties ▶ Advanced ▶ Environment Variables
- In User and System variables, look for _JAVA_OPTIONS. If found, select and delet If found, select and delete it, or edit and remove any -Xmx parameter.OPTIONS or other Java-related vars; clear those if they set memory options.
- Environment takes effect: After changes, reboot or log out/in so they apply.
For example, Arduino’s own documentation notes that if _JAVA_OPTIONS is set, Arduino sees it and crashes. In a wider sense, any Java app can be affected. Removing these global variables often lets Java launch normally. The embedded screenshot below shows the Environment Variables window with _JAVA_OPTIONS highlighted (you might have to scroll to find it):
Figure: Windows Environment Variables (highlighting _JAVA_OPTIONS).
Fix #4 – Run as Administrator
Sometimes Java just needs higher privileges. If you’re on Windows, try running the Java program or installer as Administrator. Right-click the .exe or the Command Prompt and choose Run as administrator. This avoids file authorization issues or access-denied problems. Simply granting administrator rights resolves hidden permission issues. (On Linux/Mac,run with sudo.) Try this step before a deeper fix. A Version (32-bit vs 64-bit)vs 64-bit)
If you install the wrong “flavor” of Java, the JVM can fail. Make sure the bitness of Java matches your system:
- 64-bit Windows: Install 64-bit Java x64. If you install 32-bit Java on a 64-bit system, the JVM is limited to about 1.4 GB of heap, which can cause errors when programs need more memory.y.
- 32-bit Windows: Use the 32-bit (x86) Java if you have an older 32-bit OS.
- Remove any unused Java versions. It’s common to have an old Java 8 and a newer Java 17 installed. Keep only the one you need.
You can check by running java -version in a Command Prompt: it will say “64-Bit Server VM” for 64-bit Java. If you find a mismatch (e.g., your PC is 64-bit but it says “Client VM” and no “64-Bit”), uninstall and reinstall the correct version. This fix resolves many crashes by ensuring Java can use all available RAM and libraries properly.
Fix #6 – Fix Arduino IDE JVM Error
If this error comes up specifically in the Arduino IDE (Windows), there are a few Arduino-specific tweaks:
- Check Arduino.l4j.ini memory setting: Go to the Arduino program folder (usually C:\Program Files (x86)\Arduino). Open arduino.l4j.ini in a text editor. Look for the line starting with -Xmx. By default, it should be -Xmx512M. If yours is higher or missing, set it to -Xmx512M and save the file. This limits the IDE to 512 MB, which is usually enough.
- Run arduino_debug.exe: In the same folder, double-click arduino_debug.exe. Watch the console. If you see something like:
- Picked up _JAVA_OPTIONS: -Xmx2G
- An error occurred during initialization of the VM
- Could not reserve enough space for the object heap
- it means a system _JAVA_OPTIONS is interfering. In that case, follow the earlier steps to remove _JAVA_OPTIONS.
- Reinstall Arduino IDE: If no environment variable is the culprit, try reinstalling. The official advice is that reinstalling the IDE often fixes corrupt files. Download the latest Arduino IDE from the Arduino website.
- Upgrade to Arduino IDE 2.x: The new Arduino 2.0 IDE doesn’t rely on Java at all. It uses a different runtime, so this JVM error won’t happen there. If you can, using IDE 2.x is a surefire way to avoid Java errors in Arduino.
The Arduino docs themselves highlight these steps. For most Arduino users, simply fixing the -Xmx line or removing a bad _JAVA_OPTIONS setting will cause the IDE to launch again without the Java VM error.
Fix #7 – Scan for Corrupt System Files
On Windows, sometimes underlying system files (that Java relies on) can become corrupt. Running the built-in System File Checker can repair these. To do this:
- Open Command Prompt as Administrator (search “cmd”, right-click, Run as admin).
- Type sfc /scannow and press Enter.
This will scan Windows system files and fix any problems. It may take a few minutes. After it finishes, reboot and try your Java program again. If SFC reports it fixed issues, great; if it found but couldn’t fix some, you can follow Microsoft’s guide to repair those manually (for example, using the DISM tool first).
Running SFC is a good “catch-all” fix – it generally restores any missing or damaged Windows components. It doesn’t specifically target Java, but a healthy system is less likely to throw strange errors. Microsoft documents the SFC tool to fix system corruption, and it’s worth a try if other fixes haven’t helped.
Real-Life Example (US Scenario)
Scenario: Alice is a college student in California working on her Arduino project. She downloads the latest version of the Arduino IDE for Windows 11. When she double-clicks the IDE icon, it flashes an error “Error: Could not create the Java Virtual Machine.”
How she fixed it: Alice followed Fix #6 above. She opened arduino.l4j.ini (found in C:\Program Files (x86)\Arduino) and noticed the memory line read -Xmx1024M. She changed it back to the default -Xmx512M and saved. On relaunch, the IDE started fine. Later, she realized that one of her other programs had set a global _JAVA_OPTIONS=-Xmx2G, so she also removed that from the Windows environment variables. This solved any remaining Java conflicts.
Another scenario: Bob is a software developer in New York, building a Java app on his 64-bit Windows 10 machine. He recently upgraded from Java 8 to Java 11. Now his Tomcat server won’t start, showing the JVM error and “Could not reserve enough space for object heap.” Following Fix #1, Bob lowered the max heap. He edited the Java shortcut to include -Xmx1024M instead of a higher value. That change allowed Tomcat to start. He also reinstalled Java (Fix #2) to make sure the upgrade was clean. In this case, balancing the memory settings and a fresh install fixed it.
These examples show that with the right fix, the error is usually not terminal – just an extra step or two and you’re back in business.
Pro Tips to Prevent Java Virtual Machine Errors
- Keep Java Updated: Use the latest Java LTS release (e.g., JDK 21 or 22) to avoid bugs.
- Official Downloads Only: Always get Java from Oracle or a trusted OpenJDK distributor, not random sites.
- Avoid Manual Memory Tweaks: Change -Xmx only when needed. Mistyping can break the JVM start.
- Check System Type: On a 64-bit PC, always install 64-bit Java unless you have a reason not to.
- Use Proper Tools: Tools like Eclipse or IntelliJ often manage their own JVM settings; check their config if you see errors in those IDEs.
By maintaining your Java environment and using official installers, you reduce the chance of this error happening again.
Internal Linking Suggestions
For more help, you might consult related guides on our site: – How to Install Java on Windows 11 (Step-by-Step Guide) – Learn how to properly install Java to avoid path or bitness issues.
– Fix Common Arduino IDE Errors Quickly – A handy article covering Arduino issues (including JVM problems).
– Best Java IDEs for Beginners in the USA – Tips on choosing the right Java editor/IDE, which can help avoid setup errors.
External Reference Suggestion
- Oracle’s Official Java Documentation: Oracle’s Java documentation and troubleshooting guides are authoritative sources for Java setup and error resolution. (For example, see Oracle’s official FAQ or Java Platform documentation for JVM errors.)
FAQ
Q: Why do I get “Error could not create the Java Virtual Machine”?
A: This error means Java failed to start. Common reasons include incorrect memory settings (too high -Xmx), a bad Java installation, or conflicting system settings. Essentially, something blocked the JVM from launching, which is why it shows that error. (Think of it as Java saying, “I can’t get started.”)
Q: How do I fix the JVM launcher error quickly?
A: First, try lowering the max heap size (-Xmx) or removing any bad _JAVA_OPTIONS (see Fix #1 and #3). Also, reboot and try running the app as Administrator (Fix #4). Often, just one of these steps fixes it. If not, a clean reinstall of Java (Fix #2) usually does the trick.
Q: Does this error affect Arduino users?
A: Yes, Arduino IDE 1.x users sometimes see this message. The fix is Arduino-specific: check the arduino.l4j.ini file and set -Xmx512M, and remove any global _JAVA_OPTIONS as described in Fix #6. Upgrading to Arduino IDE 2.x also avoids the issue entirely.
Q: Can incorrect RAM settings cause JVM errors?
A: Absolutely. If the JVM is told to use more memory than is available (or more than 32-bit limits), it will crash at startup. That’s why setting a sensible -Xmx (like 1024M on most laptops) frequently resolves the error. Always ensure your -Xmx value is within your system’s actual memory limits.
Q: Is reinstalling Java necessary?
A: Not usually first, but it’s a good fallback. If modifying settings doesn’t help, uninstall Java completely and reinstall the latest version from Oracle or OpenJDK (Fix #2). A fresh install clears corruption or misconfigurations. Many users find that after a clean reinstall, the error goes away.
Conclusion
“Error could not create the Java Virtual Machine” is a frustrating but fixable problem. We’ve covered the main causes – memory limits, bad installs, wrong versions, and Arduino quirks – and seven fixes you can try right now. In most cases, adjusting the heap size, correcting environment variables, or reinstalling Java will resolve the issue. Remember, this is a common JVM issue and nothing to panic about. Take it stage by stage: check memory flags, match Java to your system, and update/reinstall if needed.
Stay proactive to avoid the Error Could Not Create the Java Virtual Machine issue in your Java programming adventures.
Don’t let this error block you – follow the debugging steps above, and you’ll have your Java app running again quickly. For more tips on Java setup and troubleshooting, feel free to browse our other guides. Good luck, and enjoy coding!
Remember, the Error Could Not Create the Java Virtual Machine issue can often be resolved quickly with the correct settings.
In conclusion, addressing the Error Could Not Create the Java Virtual Machine early can help maintain productivity.


Leave a Reply