An Arduino button (pushbutton) is a simple input device. When pressed, it completes a circuit and sends a signal to your Arduino, letting you interact with your project. Use it as a doorbell, light switch, or for many other DIY ideas. Learning to wire and code an Arduino button opens the door to many fun projects.
What Is an Arduino Button?
An Arduino button is just a small switch that connects or disconnects a circuit. Think of it as the same type of button you find on a doorbell or a TV remote. When the button is not pressed, the circuit is open and no current flows. Press the button, and the circuit closes, allowing electricity to flow. This simple on/off action is how your Arduino can “know” when you’ve pressed the button. In electronics terms, when the button is pressed, it sends a “HIGH” signal to the Arduino, and when it’s not pressed, you usually get a “LOW” signal.
Most pushbutton is normally open: they connect only when pressed. Some are normally closed and break the circuit when pressed. Normally open types are easiest for beginners: pressing closes the circuit. In Arduino projects, connect the pushbutton and a resistor to a digital input pin. Pressing pulls the pin HIGH (5V); releasing lets the resistor pull it LOW (0V). This lets your code detect the change.
How an Arduino Button Works (Simple Explanation)
Basic Circuit Concept
At its core, a button just lets voltage flow or not flow. Imagine a 5V power source on your Arduino board. One side of the pushbutton is connected to this 5V. The other side goes to a digital input pin on the Arduino. There is also a resistor from the input pin to ground. When the button is not pressed, the resistor pulls the input pin down to 0V (ground), so the Arduino reads LOW. When you press the button, you connect 5V straight to the input pin, so it reads HIGH. It’s a little like flipping a simple light switch on and off, but at a small voltage, your Arduino can read.
A 10kΩ “pull-down” resistor keeps the pin LOW when the button isn’t pressed. Alternatively, use Arduino’s built-in pull-up resistor: wire the button to ground, set pinMode to INPUT_PULLUP. The default state is HIGH, and it goes LOW when pressed. Both methods work: closed = HIGH, open = LOW, or vice versa.
Digital Input in Arduino
Arduino boards read inputs as digital signals: HIGH or LOW. A HIGH signal usually means 5 volts (or 3.3V, depending on the board), and LOW means 0 volts. Pushbuttons are used as input devices because they give a clear HIGH/LOW signal when pressed. This is very useful for telling your Arduino what’s happening. For example, if you wire a button to pin 2, then in your code, you do digitalRead(2). When you press the button, digitalRead returns HIGH; when you release it, it returns LOW.
Buttons are popular input devices because they are cheap and intuitive. Even very complex smart devices started with simple buttons. For example, in US homes, a classic single-pole push-button switch might turn on a porch light with one click. In your Arduino project, that same idea applies: one click of the button can turn an LED on or off, send a message, or start a motor. The Arduino reads each button press as a binary decision (yes/no), which your program can respond to.
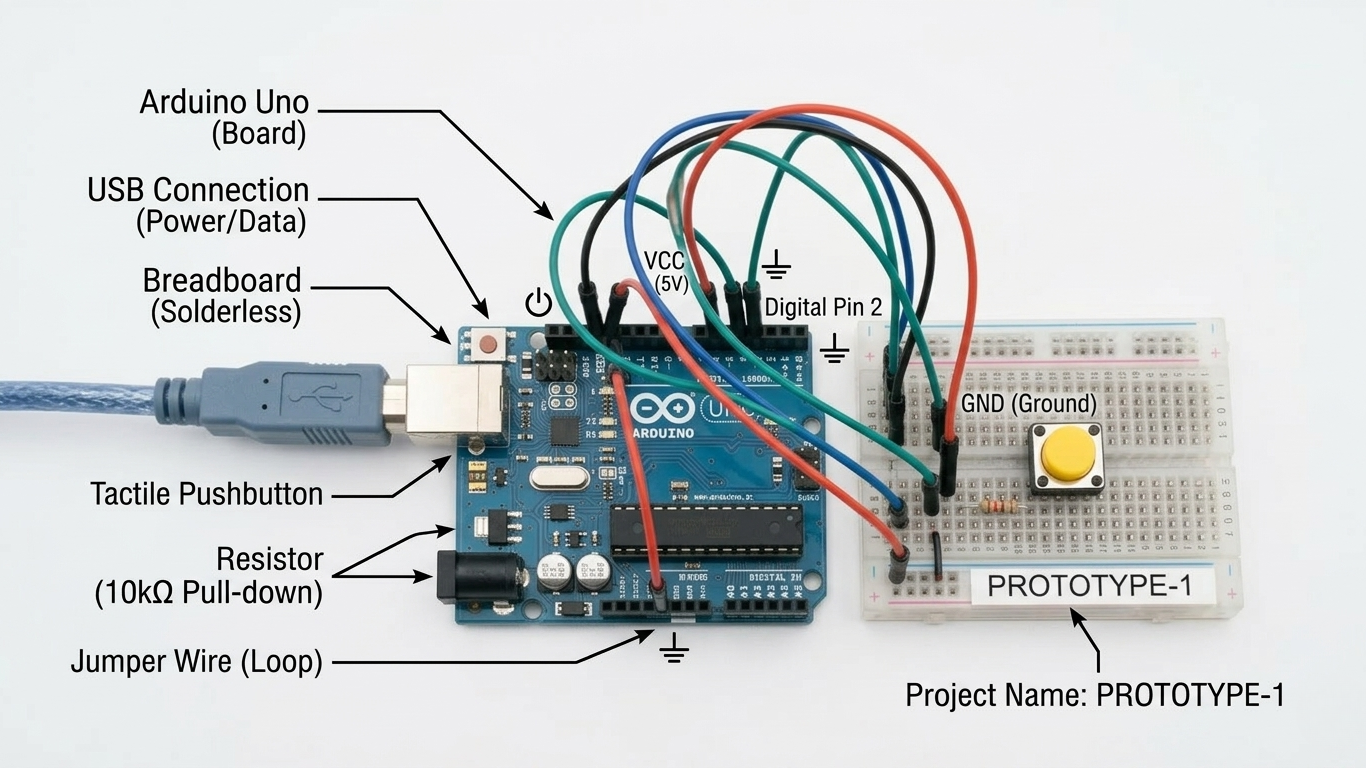
Components You Need to Use an Arduino Button
To work with an Arduino pushbutton, you’ll need a few basic parts. Here’s a quick list:
- Arduino board: (Uno, Nano, etc.) – this is the microcontroller platform.
- Breadboard: for easy wiring without soldering.
- Jumper wires: to connect components.
- Resistor (typically 10kΩ): used as a pull-down or pull-up resistor.
- Pushbutton (tactile switch): the actual button.
- LED (optional): often used to test the button (lights up when pressed).
These basic parts come in most starter kits. Beginner kits often include multiple pushbuttons and LEDs because they’re essential for learning digital input.

How to Wire an Arduino Button (Step-by-Step)
Basic Wiring Setup
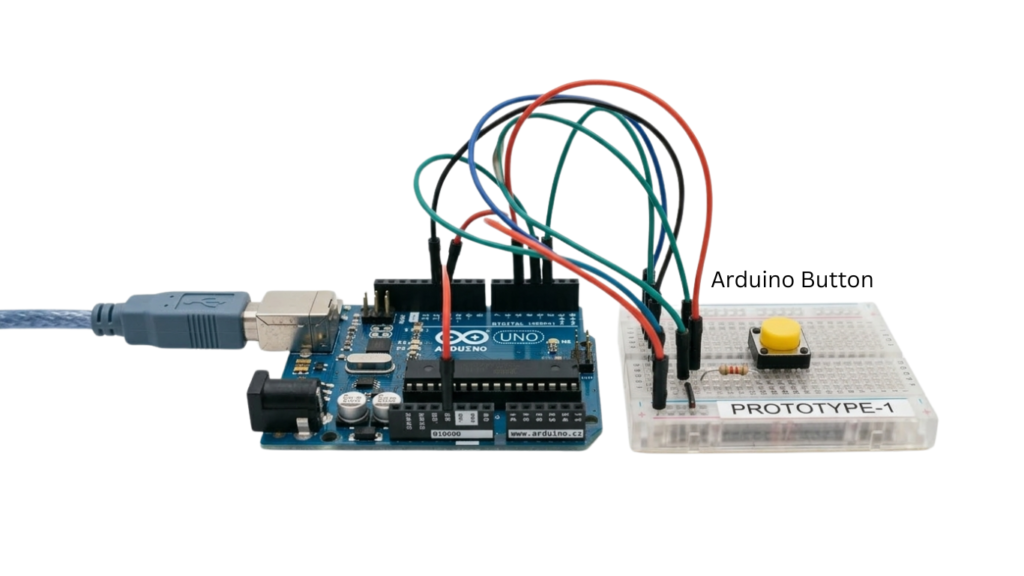
Wiring an Arduino button is straightforward. Place the button across the middle gap of the breadboard so it connects the two sides when pressed. n pressed.
- Connect one leg of the button to a digital input pin (e.g., pin 2) and the other to ground (GND).
- Add a resistor (10kΩ) either from the input pin to ground (pull-down) or use the Arduino’s internal pull-up resistor by wiring the button to ground and setting INPUT_PULLUP. This sets the pin to its default state.
- Add a resistor: Place a 10kΩ resistor between the digital pin (with the button) and the 5V line (if using pull-down) or between the pin and ground (if using pull-up). This ensures the pin has a default state.
If you use a pull-down resistor (to 5V), then the pin is normally LOW (0V) and becomes HIGH (5V) when the button closes. If you use the Arduino’s INPUT_PULLUP mode instead, you wire the resistor internally and connect the button to ground. In that case, the input is normally HIGH and goes LOW when pressed.
Common Mistakes to Avoid
Common button issues include:
- Floating Input: Without a resistor, the pin can randomly read HIGH or LOW. Always use a pull-down or pull-up resistor for a defined state.
- Wrong Resistor Placement: Make sure your resistor connects to the correct line. A pull-down resistor should connect between the Arduino pin and ground. A pull-up setup uses an internal or external resistor between the pin and 5V.
- No PinMode: Always set pinMode(buttonPin, INPUT) or INPUT_PULLUP in setup() to avoid code errors.
- Incorrect Wiring: One side to pin, oIncorrect Wiring: One side to pin, the other to ground or 5V.duino.
Arduino Button Code Example
Simple Pushbutton Code
Here’s a basic example of Arduino code that reads a button and turns an LED on or off:
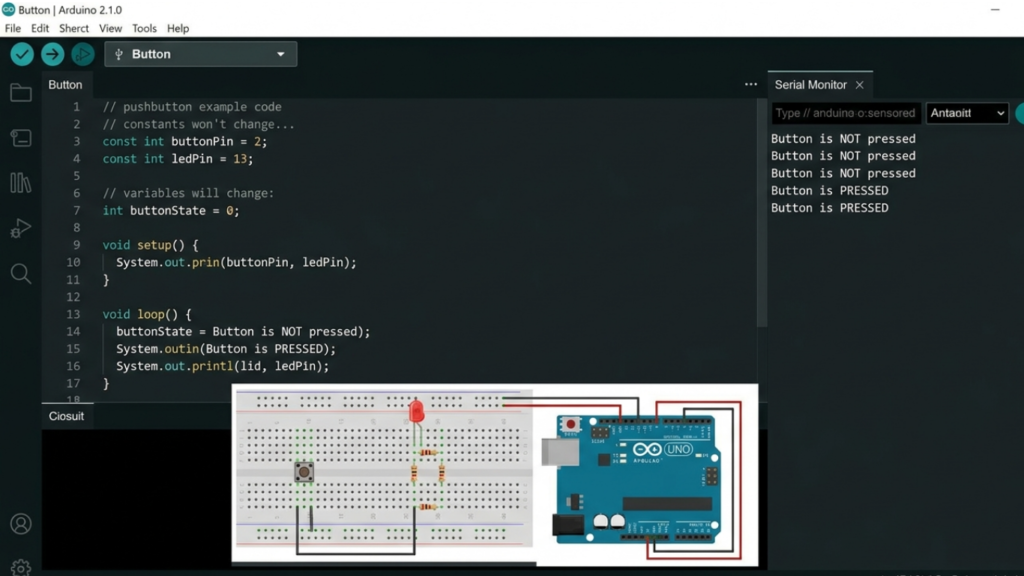
| cpp Copy const int buttonPin = 2; // Pin connected to button const int ledPin = 13; // Pin connected to LED (built-in LED on most boards) void setup() { pinMode(buttonPin, INPUT); // Set button pin as input pinMode(ledPin, OUTPUT); // Set LED pin as output } void loop() { int state = digitalRead(buttonPin); // Read the button state if (state == HIGH) { digitalWrite(ledPin, HIGH); // Turn LED on if button pressed } else { digitalWrite(ledPin, LOW); // Otherwise, turn LED off } delay(50); // small delay to stabilize } |
This code checks the button pin (2). When pressed (HIGH), the LED (pin 13) turns on. Release: pin goes LOW, LED turns off.
Explanation of Code
- pinMode(buttonPin, INPUT) tells Arduino to read voltage on the button pin.
- digitalRead(buttonPin) returns HIGH or LOW depending on the pin’s state.
- digitalWrite(ledPin, HIGH) or LOW turns the LED on or off based on the button.
- The delay(50) helps with simple debouncing, giving the button time to settle.
With INPUT_PULLUP (pinMode), wire buWith INPUT_PULLUP (pinMode), wire the button to ground; logic reverses, so pressed = LOW. pin, react to HIGH or LOW.
Types of Push Buttons in Arduino and Real Life
Standard Pushbutton (Arduino Projects)
The standard Arduino pushbutton is a small, square tactile switch for breadboards and low-voltage applications. Press the top to close the connection.
Single Pole Push Button Switch
A single-pole push-button switch (SPST) is a common household or industrial switch. It means one circuit (pole) that either opens or closes (single throw). In-home wiring can handle mains electricity (120VAC in the US). In Arduino usage, treat it similarly to a small pushbutton, but be aware that actual single-pole wall switches carry much higher voltages and should not be directly connected to your Arduino without proper isolation (e.g., a relay).
Push Button Dimmer Switch
A push-button dimmer switch combines a push-button with dimming functionality. Instead of a simple on/off, it can adjust the brightness of a light (often by rapidly turning it on/off to simulate dimming). In a smart lighting context, you might see a button that dims or cycles through levels. For Arduino, you could replicate this by reading multiple quick presses or using the button to cycle through PWM levels on a lamp.
Modern Push Button Light Switch
Modern push-button light switches (and touch switches) are found in many US smart homes. They look sleek and may have touch-sensitive or capacitive buttons. Some integrate features like a dimmer slider or connectivity (e.g., Wi-Fi). Compared to a plain Arduino pushbutton, these are part of finished electrical fixtures. You can interface with them using low-voltage control (e.g., smart relays) or simply draw inspiration from their design for DIY interfaces.
Antique Style Light Switches
Antique-style pushbutton switches (from early 1900s designs) are making a comeback in vintage home decor. They often have a decorative plate and a toggling push mechanism (sometimes with porcelain buttons). While these are not used in typical Arduino projects, they can inspire enclosure or interface design. For example, you might mount modern electronics behind an antique switch faceplate to give your Arduino-powered lamp a cool retro look.
Practical Arduino Button Projects
LED Control Project
One of the simplest projects is to use an Arduino button to control an LED. With the wiring above and the code example, pressing the button lights the LED. This is often the first project in Arduino tutorials. It shows how digital input (the button) can control digital output (the LED). You can try variations: hold the button to keep the light on, or press briefly to toggle the LED.
Toggle Switch System
Another common project is a toggle switch system. For instance, press once to turn something on, press again to turn it off (instead of holding the button). This requires a bit more coding: you detect the button press, then flip the state of a variable. For example, if ledState is LOW and the button is pressed, set ledState = HIGH. Then next press sets it back to LOW. This mimics how a real lamp switch works: flip-flop behavior.
Arduino Doorbell Project
A fun real-world project is an Arduino doorbell. Here, the button is like a doorbell button, and the Arduino could trigger a buzzer or play a melody. You wire the pushbutton so that when pressed, it sends a signal to the Arduino, which then activates a buzzer or speaker. You could even connect it to Wi-Fi and send a notification to your phone. This project mimics a DIY “smart doorbell” using a pushbutton as the trigger.
How to Install a Push Button Switch (Real-World Guide)
If you want to install a push button switch in a home (for lighting or a doorbell), follow these basic safety steps:
- Turn Off Power: Before touching any wires, switch off the circuit at the breaker box. Verify power is off with a non-contact tester.
- Remove Old Switch (if any): Unscrew the switch plate and mounting screws, and gently pull the switch out.
- Connect Wires: For a standard light switch, attach the hot (usually black) wire to one terminal of the new switch and the load (wire going to the light) to the other terminal. Connect the ground (green or bare copper) to the green ground screw.
- Secure the Switch: Carefully tuck wires into the box, screw the new button switch in place, and attach the faceplate.
- Restore Power and Test: Turn the breaker back on and test the switch.
For a doorbell or low-voltage system, you’ll connect the button to the doorbell transformer (often 16–24VAC). The steps are similar: identify transformer and chime wires, wire the pushbutton in series between them, then restore power and test.
Safety Tip: If you’re not comfortable with electrical work, consult a licensed electrician. Always double-check that the power is off before wiring any push-button switch in a home.
Common Problems and Troubleshooting
Button Not Responding
- Loose or Wrong Wiring: Check your breadboard or wiring connections. Make sure the button’s legs are in the correct rows, and the wires are snug.
- Wrong Pin in Code: Verify that the pin number in pinMode and digitalRead matches the one you wired the button to.
- No Power: If using an external pull-down, ensure 5V is connected (or that the internal pull-up is enabled in code).
Button Gives Random Signals
- Floating Input: This is the most common issue. If there’s no resistor, the pin might randomly read HIGH or LOW. Use a pull-down resistor or enable INPUT_PULLUP to fix this.
- Debounce Noise: Mechanical buttons can bounce. That means pressing once might look like multiple presses. In code, a short delay(50) or a debounce check (reading the button twice) can filter this out.
If you encounter weird behavior, double-check your wiring and resistors first. Then review your code’s logic. Often, enabling the pull-up resistor or adding a small delay resolves most issues.
Arduino Button vs Traditional Light Switches
| Voltage | Low voltage (5V/3.3V) | Mains voltage (120V/240V AC) | Mains voltage (AC) |
| Use Case | Prototyping, learning | Home/Commercial lighting | Decorative home lighting |
| Design | Basic electronic component | Sleek, often smart-capable | Vintage, ornate |
| Installation | Breadboard / wiring shelf | Electrical box by electrician | Often DIY-friendly |
| DIY vs Commercial | Used in custom DIY projects | Standard in homes/offices | Popular in retro designs |
Arduino buttons are for low-power hobby projects and prototypes. Modern push-button light switches control real electricity in homes and may include dimming or smart features. Antique-style switches work with household wiring but have a classic look. The Arduino button is on the DIY end of the spectrum, while home light switches are commercial products designed for safety and style.
Best Practices for Using Arduino Buttons
- Use Debounce: Always account for switch bounce. Use a small delay or a debounce library in your code so that a single press isn’t misread as multiple presses.
- Clean Wiring: Keep jumper wires short and neat. Loose wires can cause intermittent connections, especially on a crowded breadboard.
- Proper Resistors: Use the correct pull-down (or pull-up) resistor values (10 kΩ is typical). This prevents shorting 5V directly to ground and gives a stable reading.
- Test with an LED: Start by attaching an LED (with a resistor) to confirm your button and code are working before moving on to more complex parts.
- Label Pins: If you have many buttons or sensors, label your breadboard or use colored wires to avoid confusion.
Internal Linking Suggestions
- Arduino Beginner Guide – A basic tutorial for Arduino newcomers.
- How to Use Arduino Sensors – Learn about wiring and code for sensors in your projects.
- Top Arduino Projects for Beginners – Project ideas to practice your skills.
External Reference Suggestion
For official details, refer to the Arduino documentation on digital inputs and pushbuttons. Websites like Arduino.cc or SparkFun Electronics also have great tutorials on wiring and programming pushbuttons for beginners.
FAQ
What is an Arduino button used for?
An Arduino button (pushbutton) is used as a user input. When pressed, it sends a digital signal (HIGH or LOW) to the Arduino. This lets you control LEDs, motors, or run code in response to a press. For example, you might use a button to start a sketch, navigate a menu, or simulate a light switch in a DIY project.
How does a pushbutton work in Arduino?
In an Arduino circuit, a pushbutton completes or breaks a circuit. It has two states: open (not pressed) or closed (pressed). One side of the button goes to an input pin, the other to 5V (or ground). When pressed, it connects these together. The Arduino reads the pin; if it sees a voltage (HIGH), it knows the button is pressed; otherwise, it reads LOW.
Do I need a resistor for the Arduino button?
Yes. A resistor (usually 10kΩ) is needed as a pull-down or pull-up. Without it, the input would “float” when the button isn’t pressed, causing random signals. The resistor gives the pin a default state (LOW or HIGH). Alternatively, you can use the Arduino’s internal pull-up resistor (pinMode(pin, INPUT_PULLUP)) and wire the button to ground.
What is a single-pole push-button switch?
A single-pole push-button switch is a simple on/off switch that controls one circuit. A “Single pole” device has one input and one output. In homes, it’s like a simple light switch that turns one light on or off. In Arduino terms, a single-pole pushbutton connects or disconnects two wires (usually one to an input pin and one to ground or to voltage) when pressed.
Can Arduino control home light switches?
Not directly, since Arduino runs at low voltage. However, yes, with additional components. For example, an Arduino can activate a relay or solid-state switch that controls a 120V AC light circuit. Many DIY smart switches or IoT devices use an Arduino (or similar board) with relays to turn home lights on and off. Always take safety precautions when dealing with mains voltage!
Conclusion
An Arduino button is a fundamental, versatile component for anyone starting in electronics. It’s how your projects take input from you, turning a simple press into actions like lighting up LEDs or controlling motors. From flashing an LED to building a homemade doorbell, mastering the Arduino pushbutton is key to DIY electronics.
Now that you know the basics of wiring and coding an Arduino button, try building a simple project of your own. Start with the classic “button-controlled LED” or explore a toggle-switch system. Experiment and have fun—these small clicks are the first step toward bigger, powerful maker projects.
Ready to get started? Grab your Arduino and a pushbutton, and start building your first project today!


Leave a Reply