The Tactile Revolution: Why the Push Button Switch Still Rules
Think about the last time you started your car, brewed a cup of coffee, or hopped on an elevator. You likely interacted with a push button switch without even thinking about it. These little components are the unsung heroes of the modern American home and workplace.
In a world filled with touchscreens and voice assistants, the solid click of a well-made button stands out for its reliability and clear feedback. Whether you are a DIYer fixing a light switch or a maker starting out with Arduino projects, understanding these switches can transform your results.
Next, let’s unpack what makes these switches so versatile in various settings. In this deep-dive guide, we will explore the mechanics, the coding, and the aesthetic choices that make these switches a staple in US households and engineering labs alike.
Understanding the Core Mechanics
Before you wire up your first circuit, you need to know what’s happening under the hood. A push button switch is essentially a gatekeeper for electricity. When you press it, you either open a gate to let electrons flow or close it to stop them.
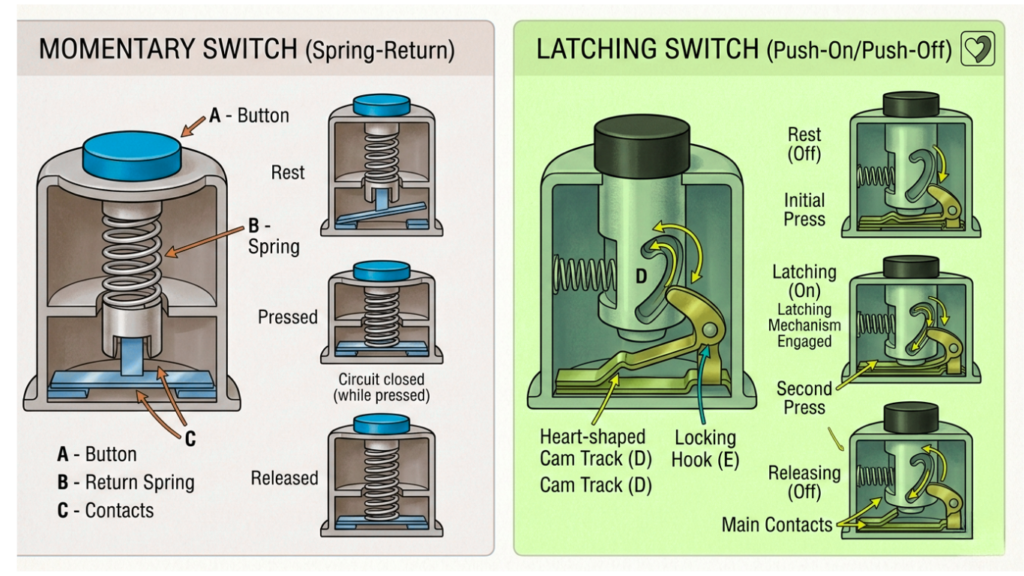
Momentary vs. Latching: Which Do You Need?
This is the most common point of confusion for beginners.
- Momentary Switches: These are “active” (allow electricity to flow) only while your finger is on the button. Examples include computer keyboards, doorbells, and the “Enter” key. When you release the button, the circuit opens, stopping the flow of electricity.
- Latching Switches: These “lock” into place when pressed. This means you press it once to turn it on (the circuit stays closed and current flows), and it remains on until you press it again to open the circuit (stop the current). Think of a classic desk lamp or a power strip.
Comparison of Common Push Button Types
To help you pick the best option for your project, here’s a comparison table based on common standards in the American market.
| Switch Type | Best Use Case | Durability (Cycles) | Typical Voltage | Common US Brand |
| Tactile (Tact) Switch | Breadboards / Arduino | 100,000+ | 12V DC | Omron / C&K |
| Anti-Vandal | Outdoor Kiosks / Elevators | 1,000,000+ | 12V-240V | E-Switch |
| Push Button Light Switch | Home Renovation / Decor | 50,000 | 120V AC | Classic Accents |
| Industrial Mushroom | Emergency Stop (E-Stop) | 100,000 | 240V+ | Allen-Bradley |
| Arcade Button | Gaming / DIY Controllers | 10,000,000 | 5V-12V DC | Sanwa / Happ |
The Resurgence of the Push Button Light Switch
If you walk into a restored Victorian home in San Francisco or a brownstone in Brooklyn, you might see two pearly buttons on the wall instead of a modern plastic toggle. This is the classic push button light switch.
Why Homeowners Love Them
- Aesthetic Appeal: They offer a “vintage-tech” look that modern rockers can’t touch.
- Longevity: Many original push-button systems from the 1920s still work today because of their robust mechanical design.
- Modern Upgrades: Today, you can buy “dimmer” versions of these classic switches that look 100 years old but control modern LED bulbs perfectly.
Arduino Push Button: The Maker’s Secret Weapon
For the engineering crowd, mastering the Arduino push button is the gateway to interactive design. If you can’t master the button, you can’t build a robot.
The “Floating Pin” Problem
When working with a push button Arduino setup, many beginners face a frustrating issue: the button seems to press itself. In electronics, this happens because the input pin is left unconnected when the button is not pressed. In the US maker community, we call this a “floating pin,” meaning the Arduino cannot tell if the pin is on or off, leading to random signals.
Since the Arduino pin is so sensitive, it picks up static electricity from the air. A pull-up or pull-down resistor is an electronic component that helps set the pin to a specific voltage when the button is not pressed, preventing the pin from floating.
Expert Coding Tip: You don’t actually need a physical resistor! Most modern Arduino boards have them built in. Use this line in your setup:
pinMode(buttonPin, INPUT_PULLUP);
This pulls the voltage “High” internally, so the button only triggers when it connects to “Low” (Ground), meaning when you press it, it completes the electrical circuit.
Popular Arduino Projects Using Buttons:
- Reaction Timers: Compete with two buttons and an LED to test reflexes.
- Home Automation: Control all lighting with one bedside button via Wi-Fi.
- MIDI Controllers: Build a music pad for use with Ableton Live.
Advanced Tech: Debouncing and Logic
When you press a metal button, the internal contacts don’t just hit once. They actually “bounce” several times in a fraction of a millisecond.
To a human, it’s one press. But to a high-speed processor like an Arduino, the rapid bouncing of the contacts appears as multiple presses. Debouncing is a way to fix this. Hardware debouncing uses a capacitor (an electronic part that smooths out rapid changes), while software debouncing uses extra code to ignore the extra signals.

Safety Standards and Regulations in the USA
- UL Listing: Always look for the “UL” mark. UL stands for Underwriters Laboratories, an independent organization that tests electrical products for fire and shock safety. UL Listing means the switch has passed these safety tests.
- Amperage Rating: The maximum electrical current the button can safely handle. Never use a button rated for 1 Amp (unit of electric current) on a circuit that pulls 15 Amps (like a space heater). The button will literally melt.
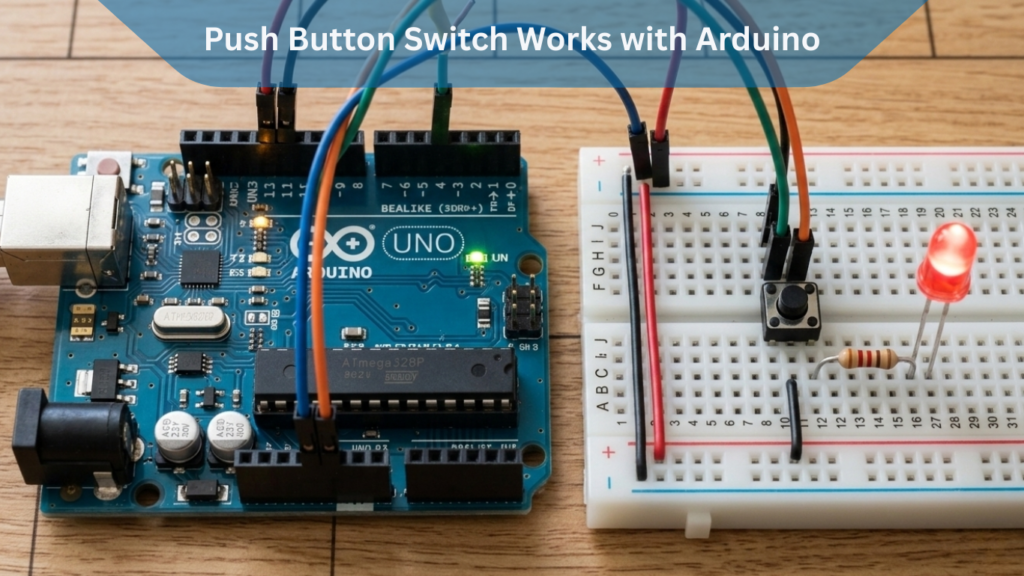
How a Push Button Switch Works with Arduino
When integrated with an Arduino, the switch sends a digital signal to the board. For instance:
| const int buttonPin = 2; // push button connected to pin 2 const int ledPin = 13; // built-in LED void setup() { pinMode(buttonPin, INPUT); pinMode(ledPin, OUTPUT); } void loop() { if (digitalRead(buttonPin) == HIGH) { digitalWrite(ledPin, HIGH); } else { digitalWrite(ledPin, LOW); } } |
This simple code makes an LED turn on when the button is pressed — a fundamental step in Arduino projects.
Frequently Asked Questions (FAQ)
1. What is the difference between a “Normally Open” (NO) and “Normally Closed” (NC) switch? In electronics, a “Normally Open” switch stays off until you press it, while a “Normally Closed” switch is always on until you press it.
A “Normally Open” (NO) switch stays off until you press it. A “Normally Closed” (NC) switch is always on, and pressing the button breaks the circuit (like an emergency stop button).
2. Can I use an Arduino push button for a 120V light?
No, not directly! An Arduino push button is designed for 5V. To control a 120V light, you must use the button to trigger a Relay, which then safely handles the high voltage.
3. Why is my push-button light switch sticking?
In older US homes, paint or dust can get into the mechanism. Sometimes a quick spray of electrical contact cleaner can fix it, but if it’s mechanical wear, it’s time for a replacement.
Conclusion: Start Your Next Project Today
The humble push button switch remains the most intuitive way for humans to talk to machines. From the satisfying “clack” of an arcade cabinet to the silent reliability of a push button arduino sensor, these components are essential for any builder.
Take your time to select the right material stainless steel for durability, plastic for cost-effectiveness, or brass for style. Once you master the wiring and the logic, the possibilities for your arduino projects are endless.


Leave a Reply