

Interest in Arduino has inspired creative projects like arduino buzzer how to make it buzz super mario reddit?
connect a piezoelectric buzzer, code its tones, and adjust the frequencies to mimic the game’s theme. This project gives hands-on experience with frequency modulation, pulse-width logic, and sound synthesis. Its popularity links education with the fun of recreating retro games, helping beginners master the basics.
What Is an Arduino Buzzer and How Does It Work?
An Arduino buzzer is a small device that makes sounds when powered. There are different types, but the most common with Arduino is the piezoelectric buzzer. This type works because certain materials change shape when an electric field is applied, and these changes generate vibrations. When these vibrations happen at speeds we can hear, about 20 to 20,000 times per second, they make sound waves.
A buzzer is simple on the outside, but playing a song requires the right signals. In things like microwaves or smoke alarms, the buzzer just makes a single loud sound. An Arduino, though, lets you easily adjust how quickly the pin turns on and off to produce different notes.
The Critical Difference Between Active and Passive Buzzers
Beginners often confuse active and passive buzzers, as seen in many Reddit help threads. Using the wrong type is a common reason Super Mario projects don’t make the expected melody.
The Arduino Uno is a favorite because it is easy to connect parts and has many available programs online. While you could use other Arduino models, the Uno’s 5V pins work well with small buzzers. Usually, you don’t need extra parts to make it louder. You need a passive buzzer for this project. An active buzzer can’t make the full Mario song.
The need for an optional resistor is debated. A piezo buzzer primarily acts as a capacitive load and usually draws little current, so a resistor is usually unnecessary. However, small magnetic transducer buzzers can exceed Arduino’s $40\text{ mA}$ per-pin limit. In these cases, a $1\text{ k}\Omega$ resistor protects the Arduino by limiting current and can lower the buzzer’s volume. If unsure about your buzzer’s type, start with a $1\text{ k}\Omega$ resistor.
How to Connect a Buzzer with Arduino (Easy Wiring Guide)
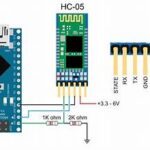
Wiring is simple. Note the buzzer’s orientation. Most buzzers have a positive leg (marked ‘+’ or longer) and a negative leg.
- Placement: Insert the passive buzzer into the breadboard, ensuring the two pins are in different numbered rows to avoid a short circuit.
- Positive Connection: Use a jumper wire to connect the buzzer’s positive terminal to Digital Pin 3 on the Arduino. Pin 3 is often used in Super Mario code snippets because it supports Pulse Width Modulation (PWM). The tone() function can technically use any digital pin.
- Ground Connection: Connect the negative terminal of the buzzer to the Arduino’s Ground (GND) pin.
- Integrating the Resistor: If using a resistor for protection or volume control, place it in series. Connect Pin 3 to one side of the resistor, then connect the other side to the buzzer’s positive terminal.
This circuit is popular because it is simple. You don’t need a separate power supply. The Arduino gives enough power to small buzzers. If you need it louder—like for a home doorbell you can add a transistor. This lets you use a bigger speaker and a separate battery.
Common Wiring Mistakes to Avoid
Even with just a few parts, small mistakes can mean no sound or parts getting too hot. Reddit users warn about three common problems.
- Active vs. Passive Mix-up: An active buzzer will ignore the code’s frequencies and either remain silent or emit a continuous beep.
- Loose Jumper Wires: Breadboards can have loose clips. If the sound is crackly or cuts out, first press the wires and components together firmly.
- The Arduino code must match your wiring. If the code uses pin 8 but the buzzer’s wire is in pin 3, there will be no sound. Double-check the #define buzzerPin line for consistency.
People like the Mario song on Reddit because it is special and not easy to play. Unlike simple songs, the Mario tune is fast and changes tempo and notes often. This makes it a good test for Arduino’s tone() function, which plays sounds. This function starts the sound and moves on to the next step right away, so you must use small pauses in the code to let each note finish.
Super Mario Theme Arduino Code (Beginner-Friendly)
A typical Super Mario program uses two lists: one for notes and another for how long each note should play. This makes the code easier to understand and change. The notes are often put in a separate file called pitches.h.
| /* Arduino Super Mario Bros Theme Modified for clarity and beginner use */ #define NOTE_E7 2637 #define NOTE_G7 3136 #define NOTE_E6 1319 #define NOTE_G6 1568 //… (additional notes from pitches.h) int melody = { NOTE_E7, NOTE_E7, 0, NOTE_E7, 0, NOTE_C7, NOTE_E7, 0, NOTE_G7, 0, 0, 0, NOTE_G6, 0, 0, 0 }; int tempo = { 12, 12, 12, 12, 12, 12, 12, 12, 12, 12, 12, 12, 12, 12, 12, 12 }; const int buzzerPin = 3; void setup() { pinMode(buzzerPin, OUTPUT); } void loop() { int size = sizeof(melody) / sizeof(int); for (int thisNote = 0; thisNote < size; thisNote++) { // Calculate note duration: 1000ms divided by tempo int noteDuration = 1000 / tempo[thisNote]; tone(buzzerPin, melody[thisNote], noteDuration); // To distinguish notes, set a minimum time between them int pauseBetweenNotes = noteDuration * 1.30; delay(pauseBetweenNotes); // Stop the tone noTone(buzzerPin); } delay(2000); // Wait before repeating } |
This code uses a standard loop to iterate through the melody array. The value 0 represents a rest (silence). The noteDuration calculation is a simplified approach to timing: a higher tempo value results in a shorter note.
How the Code Works (Simple Explanation)
The logic behind playing music on a microcontroller is to generate square waves at precise intervals. Each specific frequency produced matches a musical note. In this code, NOTE_E7 corresponds to a frequency of 2637 Hz, or 2637 cycles per second. When the tone() function is called, the Arduino uses its hardware timers to automatically switch the output pin on and off at this exact frequency, creating the tone you hear.
Timing and delays are arguably more important than the frequencies themselves for recognizability. Without the pause between notes (calculated as 1.3 times the duration), the individual notes would bleed into each other, creating a continuous, indistinguishable drone rather than a crisp melody. The noTone() function is explicitly called to clear the pin’s state, which is a best practice to prevent the buzzer from “sticking” on a single tone if the loop ends unexpectedly.
Troubleshooting Your Arduino Buzzer Project
Even experienced builders encounter challenges with audio output. On Reddit, troubleshooting is a group effort, focusing on these common scenarios:
- No Sound Issue: If you hear nothing, check connections and power first. Make sure the buzzer is connected to the pin specified in the code. If you’re using a breadboard, confirm that the power rails are powered and that there is a shared ground between the Arduino and the buzzer; without this, the circuit will not complete, and no sound will be produced.
- Wrong Tone or Noise: If the melody sounds distorted or “off,” the issue may be related to the pitches.h definitions. Check that the frequencies match the standard Western musical scale. Additionally, magnetic buzzers can sound distorted if driven with too much current; adding a resistor often fixes this.
- Inconsistent Playback: If the melody stutters, it might be due to blocking code or high serial monitor traffic. Avoid using Serial.println() excessively within the music loop, as the time required to send data to the computer can degrade note timing precision.
Quick fixes often involve simplifying the circuit. Try removing the resistor to see if the buzzer is too sensitive to the resistor’s resistance. Replace the buzzer with a simple LED to check whether the Arduino is sending a signal. If the LED blinks rapidly to the song’s rhythm, the code and wiring are correct, and the problem is likely with the buzzer.
Creative Projects Using a Buzzer with Arduino
Once the Super Mario melody is mastered, the possibilities for expansion are endless. The buzzer is the primary feedback mechanism for countless interactive projects in the maker world.
Mario-Themed Doorbell
By adding a simple push-button to the circuit, the Super Mario theme can become a functional doorbell. The code has been modified so that the melody plays only when digitalRead(buttonPin) returns HIGH. This project is a favorite in the US “Smart Home” DIY community, as it adds a touch of personality to standard home hardware.
Alarm System
A buzzer plus an Ultrasonic or PIR motion sensor creates a room alarm. Play the “Underworld” theme from Super Mario Bros when the sensor detects movement. This uses conditional logic, so sound depends on outside sensor data. ound Effects
Makers often build their own handheld gaming devices using Arduino. The passive buzzer provides “haptic” audio feedback, such as the sound of jumping, collecting a coin, or losing a life. These short sound effects, known as “earcons,” are essential for a good user experience in DIY gaming.
Arduino Buzzer with Water Detector (Bonus Project)
A practical, potentially money-saving application for US homeowners is the Arduino buzzer with water detector. In regions prone to basement flooding, early detection of a leak can prevent thousands of dollars in water damage.
A water level sensor uses an interleaved pattern of copper traces to measure conductivity. When water touches the traces, it completes a circuit, and the Arduino reads a change in analog voltage.
| Below 100 | Dry / Empty | No sound. |
| 100 – 300 | Low Moisture | Occasional “Warning” beep. |
| 300 – 500 | Medium Leak | Steady rhythmic tone. |
| Above 500 | High Flood | Constant, high-pitched panic alarm. |
This project teaches how to integrate an analog input (the sensor) with a digital/PWM output (the buzzer). To increase reliability, Reddit experts suggest using a battery backup or a WiFi-enabled board like the ESP32 to send a text message alert to your phone in addition to the audible alarm.
Tips from Reddit Arduino Users
The Reddit community offers many optimization tips beyond official guides. These advanced techniques help you get high sound quality, even with simple components. Library Libraries: While writing your own arrays is educational, libraries like Playtune allow for much more complex music. They can handle MIDI files and even play multiple notes across different buzzers to create harmony.
- Optimize Delays: Some users use millis() instead of delay(). This non-blocking approach lets Arduino continue other tasks while music plays, such as checking for a fire or a water leak.
- Supply Matters: If the buzzer sounds weak or the Arduino resets during a loud note, it might be due to a power surge. Using a $10\text{ }\mu F$ capacitor across the power rails can smooth out voltage spikes caused by the vibrating piezo element.
Best Practices for Clear Sound Output
Achieving a clean, recognizable Super Mario theme requires more than just correct wiring. The buzzer’s acoustics play a significant role.
- Only a passive buzzer enables the required frequency modulation for music projects.
- Avoid Overlap: The tone() function on standard Arduinos can play only one note at a time on a single pin. If you try to call tone() on a second pin while the first is still active, it may have no effect or cause interference.
- Mounting a piezo buzzer in a small case or plastic cup can amplify its volume through resonance.
- Frequency Sweeps: If the buzzer sounds tinny, try a frequency sweep from $100\text{ Hz}$ to $5\text{ kHz}$. Find your buzzer’s resonant frequency. Notes nearest to this sound the loudest.al Linking Suggestions
To further your Arduino journey, consider exploring these related topics:
- “Arduino Beginner Guide”: A broad overview of the Uno ecosystem and IDE.
- “How to Use a Breadboard Step-by-Step”: Mastering the art of temporary circuit prototyping.
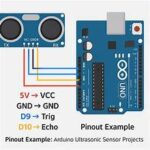
- “Top Arduino Sensors for Beginners”: From ultrasonic distance sensors to environmental monitoring.
External Reference Suggestion
For the most technical and up-to-date audio info, check the Arduino Official Documentation for the tone() function. It lists timing limits and pin details for each Arduino board. Can Arduino play full songs like Super Mario?
Yes. The only limit is the Arduino’s memory. A standard Uno has enough space for several complex melodies. For longer orchestral pieces, you can store the music data on an SD card and use a library like TMRpcm to play it back.
Do I need a passive buzzer for music projects?
Yes, this is crucial. Active buzzers have an internal oscillator and can play only one fixed tone. Passive buzzers act like speakers. They can play any frequency from the Arduino. Is my buzzer making only a beep sound?
This usually means you are using an active buzzer, or that your code sends only a single digitalWrite(HIGH) instead of tone(). If the buzzer beeps when directly connected to a $5\text{V}$ battery, it is active. Use this project as a real alarm system?
While an Arduino is great for prototyping, certified products are safer for life-safety applications like smoke detectors. For “convenience” alarms, such as a water detector, Arduino is reliable for DIYers. What is required for buzzer projects?
Yes, coding is required to define the melody’s frequencies and rhythm. However, the Arduino community has provided thousands of “open-source” Super Mario sketches that beginners can copy and paste into the IDE with minimal changes.
Conclusion
Mastering the Arduino buzzer project is more than just fun. It introduces you to embedded systems and signal processing. By learning the difference between active and passive buzzers and using the tone() function, you gain skills to build interactive devices. You can use a buzzer for a music box or a water leak detector. Try other melodies, like the Zelda chime or Tetris theme, and see how these sounds enhance your next project. ction

Leave a Reply