Introduction
Ever wondered how people build smart gadgets, automated lights, or even mini robots at home? The secret often starts with one small but powerful tool — Arduino.
If you’re completely new and thinking, “Can I really learn this without an engineering background?” — the answer is yes. Arduino is designed for beginners, hobbyists, and anyone curious about electronics and programming.
In this guide, you’ll learn Arduino for beginners step-by-step, from understanding what Arduino is to building your first simple project. No complicated jargon, no overwhelming theory — just practical learning you can follow easily.
By the end, you’ll know how to set up Arduino, write your first code, and start creating real-world projects.
What is Arduino and How It Works
Arduino is an open-source electronics platform based on easy-to-use hardware and software. In simple words, it’s a small computer (microcontroller) that you can program to control things like lights, motors, sensors, and more.
Why Arduino is Perfect for Beginners
- No advanced coding required
- Cheap and easily available
- Huge online community support
- Works with simple plug-and-play components
Here’s the thing — Arduino acts like a “brain.” You write instructions (code), upload them, and it executes those commands in real life.
Real-Life Example
Think of an automatic street light:
- Sensor detects darkness
- Arduino processes signal
- Light turns ON automatically
That’s Arduino in action.
Arduino Components You Need to Start
Before jumping into projects, you’ll need a few basic components.
Essential Arduino Starter Kit
- Arduino board (Uno is best for beginners)
- USB cable
- Breadboard
- Jumper wires
- LED lights
- Resistors
- Sensors (optional for advanced projects)
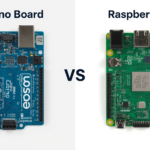
Arduino Board Comparison
| Feature | Arduino Uno | Arduino Nano | Arduino Mega |
|---|---|---|---|
| Best for | Beginners | Compact projects | Advanced projects |
| Size | Medium | Small | Large |
| Cost | Affordable | Cheap | Expensive |
👉 If you’re just starting, go with Arduino Uno. It’s beginner-friendly and widely supported.
Setting Up Arduino (Step-by-Step)
Let’s get your Arduino ready.
Step 1: Install Arduino IDE
Download the Arduino IDE (software) from the official website. This is where you’ll write and upload code.
Step 2: Connect Arduino to Your PC
Use a USB cable to connect your board.
Step 3: Select Board & Port
Inside the IDE:
- Go to Tools → Board → Arduino Uno
- Select the correct COM port
Step 4: Test with Example Code
Arduino already gives built-in examples. Try the Blink example to test your setup.
Understanding Basic Arduino Programming
Don’t worry — Arduino programming is much simpler than it sounds.
Every Arduino program has two main parts:
1. setup()
Runs once when the Arduino starts.
2. loop()
Runs again and again continuously.
Simple Code Structure
void setup() {
  pinMode(13, OUTPUT);
}void loop() {
  digitalWrite(13, HIGH);
  delay(1000);
  digitalWrite(13, LOW);
  delay(1000);
}
What This Code Does
- Turns LED ON
- Waits 1 second
- Turns LED OFF
- Repeats forever
Your First Arduino Project (LED Blink)
Now let’s build something real.
Components Required
- Arduino Uno
- LED
- 220Ω resistor
- Jumper wires
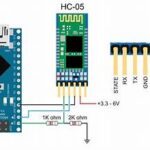
Step-by-Step Instructions
- Connect LED to pin 13
- Add resistor to prevent damage
- Upload the blink code
- Watch your LED blink 🎉
[Image: Arduino LED blinking circuit diagram]
Why This Project Matters
It may look simple, but it teaches:
- Circuit basics
- Coding logic
- Hardware + software interaction
And honestly, this is the moment most beginners feel:
“Wow, I actually built something!”
Common Beginner Mistakes to Avoid
Starting Arduino is fun, but beginners often hit small roadblocks.
1. Wrong Connections
Loose or incorrect wiring is the #1 issue.
2. Missing Drivers
If your PC doesn’t detect Arduino, install drivers.
3. Upload Errors
Make sure:
- Correct board selected
- Correct COM port chosen
4. No Resistor with LED
Skipping resistor can burn your LED.
Pro Tips to Learn Faster
If you want to improve quickly:
- Practice daily (even 20 minutes helps)
- Follow small projects first
- Don’t copy code blindly — understand it
- Join Arduino communities
Beginner Project Ideas
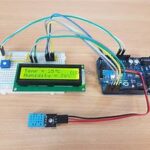
- Temperature sensor
- Motion detector alarm
- Smart light system
- Mini robot car
Image Suggestions
- [Image: Arduino Uno board labeled diagram]
- [Image: Arduino IDE interface screenshot]
- [Image: LED blinking circuit]
- [Image: Beginner Arduino project setup]
Internal Linking Suggestions
- “Top Arduino Projects for Beginners”
- “Best Sensors to Use with Arduino”
External Linking Suggestions
- Arduino Official Documentation
- Electronics tutorials from educational sites like MIT OpenCourseWare
Conclusion
Learning Arduino might feel confusing at first, but once you build your first project, everything starts making sense.
The key is simple — start small, stay consistent, and keep experimenting. You don’t need expensive tools or a technical degree. Just curiosity and practice.
If you follow this Arduino for beginners guide step-by-step, you’ll move from blinking LEDs to building real smart devices faster than you think.
So go ahead — connect your board, upload your first code, and start creating.
FAQs
1. Is Arduino good for beginners?
Yes, Arduino is one of the best platforms for beginners because it’s simple, affordable, and has massive community support.
2. Do I need coding experience to learn Arduino?
No. Arduino uses a simple version of C++, and you can learn it step-by-step.
3. How long does it take to learn Arduino?
You can learn basics in a few days, but mastering it depends on your practice and projects.
4. What is the best Arduino board for beginners?
Arduino Uno is the best choice for beginners due to its simplicity and support.
5. Can I build real projects with Arduino?
Absolutely. From home automation to robotics, Arduino can be used in real-world applications.

Leave a Reply