I have been building small electronics projects for over six years, mostly custom keyboards and desk gadgets. Everything in this article comes from boards I have soldered, bricked, and eventually gotten working on my own bench.
What Is the Arduino Pro Micro
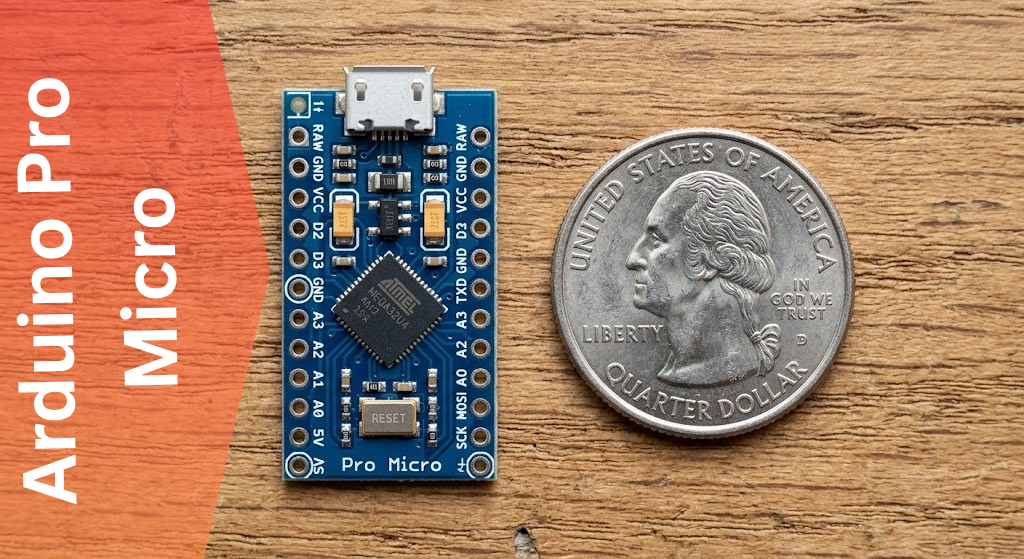
The Arduino Pro Micro is a small board built around the ATmega32U4 chip, and it is the one I reach for anytime a project needs a tiny footprint with real USB power built in.
I first tried building a macro keypad on a regular Uno. It worked on the breadboard, but the Uno only talks to your computer as a serial device. It cannot pretend to be a keyboard or a mouse. I needed something that could plug into a laptop and act like an actual HID device, and that search is what led me to the Pro Micro.
That native USB support comes straight from the ATmega32U4, the same chip used in the Arduino Leonardo, which handles USB communication directly instead of relying on a separate USB to serial chip like the Uno does. <cite index=”4-1″>The Arduino Pro Micro is a compact microcontroller board developed by Arduino, featuring the ATmega32U4 microcontroller, and this board is designed for projects requiring USB connectivity since it includes a built in USB interface</cite>. That single detail is the whole reason people pick this board over almost anything else in its size class.
Key takeaway: If your project needs to show up on a computer as a keyboard, mouse, or game controller, the Pro Micro can do that natively. A standard Uno or Nano cannot, at least not without extra hardware.
Pro Micro vs Nano, Micro, and Pro Mini
Before you order one, it helps to know where the Pro Micro actually stands out. I have used all four boards on different builds, and the differences matter more than the spec sheets suggest.
<cite index=”13-1″>The Micro sets itself apart with native USB support, which makes it a strong choice for projects that involve direct USB interaction or HID functionality, and it offers the highest number of I/O pins among the compact options</cite>. The official Arduino Micro and the Pro Micro share the same chip and USB behavior, so the comparison below applies to both.
- Pro Micro vs Nano: The Nano uses an ATmega328P and talks to your computer through a USB to serial chip. It is a fine general purpose board, but it cannot act as a keyboard or mouse on its own.
- Pro Micro vs Pro Mini: <cite index=”16-1″>The Pro Mini strips away everything non essential, which results in a smaller board with lower power consumption but requires external components for programming</cite>. Good for battery projects, bad for anything needing USB HID.
- Pro Micro vs Arduino Micro: Nearly identical internals. <cite index=”18-1″>The Micro measures about 48 mm in length and 18 mm in width, while the Nano comes in a shorter 45 mm length and lighter weight</cite>, but the official Micro costs more than a Pro Micro clone for the same chip.
If your project is battery powered and never touches a computer, go with the Pro Mini. If it needs to show up as a USB device, the Pro Micro wins every time.
Pinout and Specs You Actually Need
Here is the definition block I wish someone had handed me on day one.
Arduino Pro Micro core specs: ATmega32U4 microcontroller, 16 MHz oscillator, 5V or 3.3V logic depending on the variant, micro USB or USB-C on newer clones, and a small enough footprint to fit on almost any breadboard.
<cite index=”7-1″>The board features native communication over USB, 18 digital input and output pins, a 16 MHz crystal oscillator, and a reset button, and its form factor makes it breadboard friendly</cite>. Of those 18 pins, <cite index=”7-1″>nine have analog to digital converters for use as analog inputs, and five carry pulse width modulation functionality shown by a faint circle around the pin on the board</cite>.
Power is flexible too. <cite index=”5-1″>You can supply power through the VIN pin, with roughly 7 to 12V recommended, or through the RAW pin which accepts 6 to 20V</cite>, on top of the standard USB connection. <cite index=”11-1″>The Pro Micro has a built in voltage regulator since it was designed to run on batteries, and it comes in two variants, one that feeds the chip 3.3V and one that feeds it 5V, with the 5V version being the most common</cite>.
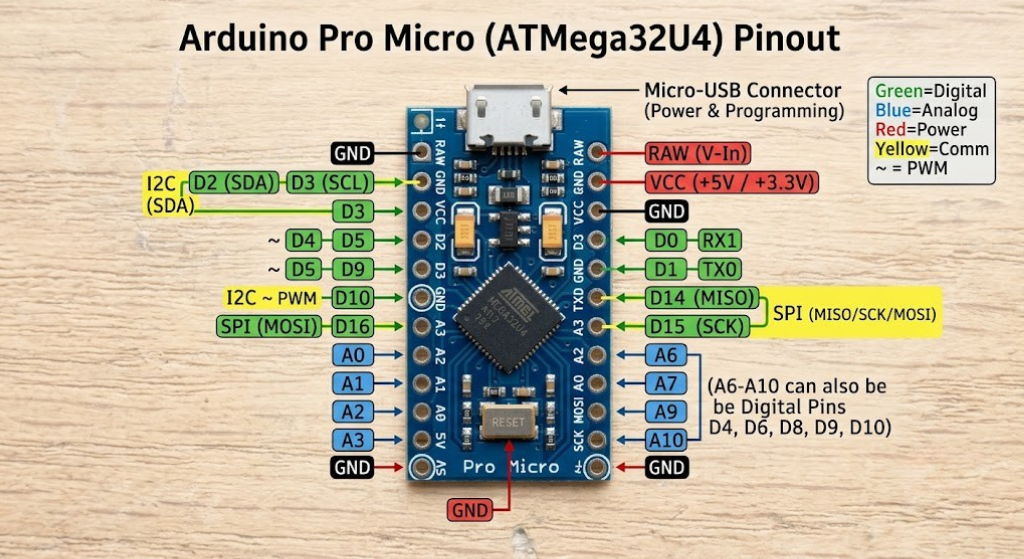
For keyboard style projects, two extra pins matter. <cite index=”11-1″>The additional B0 and D5 pins let you wire a board with up to 100 keys using a matrix of 10 rows and 10 columns, all from the same 18 plus 2 pins</cite>. That is why the Pro Micro became the default brain for custom mechanical keyboards.
Setting It Up in the Arduino IDE
Getting the IDE talking to a Pro Micro trips up a lot of first timers, mostly because it does not behave like a Uno.
- Plug the board in through micro USB.
- Open the Arduino IDE and go to Tools then Board, then choose Arduino Leonardo, since the Pro Micro shares its bootloader and USB behavior with the Leonardo.
- Select the correct COM port under Tools then Port.
- Close the Serial Monitor if it is open, then upload your sketch.
That last step matters more than it looks. <cite index=”26-1″>Because native USB boards handle communication directly through the main chip rather than a separate chip, the IDE has to briefly touch the serial port at 1200 bps to signal the board into bootloader mode, and if the Serial Monitor is already open when you upload, that touch never goes through and the upload fails</cite>. I lost an entire evening to this exact issue before I learned to always close the monitor first.
Building a Real Project: A 4 Key Macro Pad
This is the project that made me actually understand the board instead of just following a tutorial. Four buttons, four shortcuts, wired straight into a breadboard.
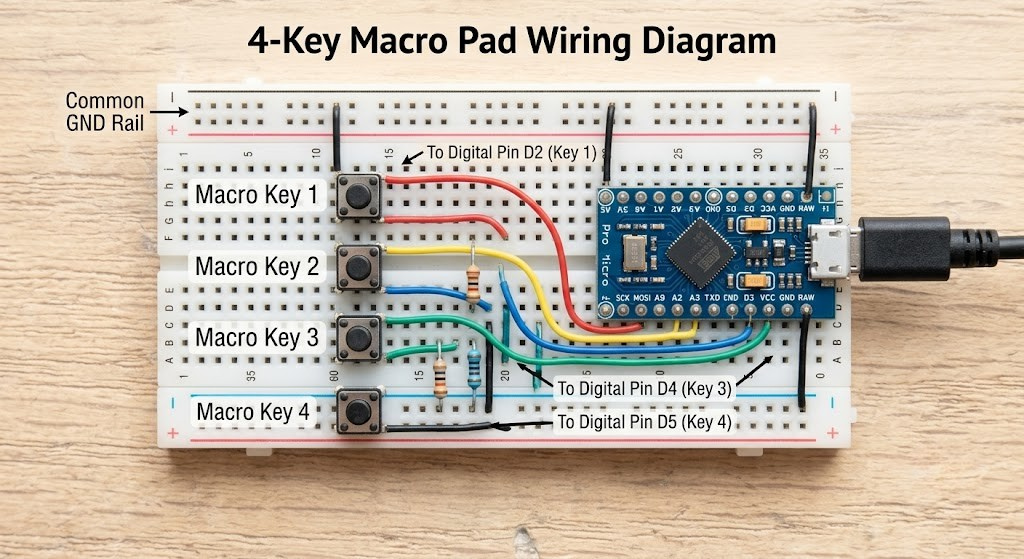
Wire one leg of each button to ground and the other to digital pins 2, 3, 4, and 5. The code below uses the internal pull up resistors, so you do not need extra resistors on the breadboard.
cpp
#include <Keyboard.h>

const int buttonPins[4] = {2, 3, 4, 5};
bool lastState[4] = {HIGH, HIGH, HIGH, HIGH};

void setup() {
  for (int i = 0; i < 4; i++) {
    pinMode(buttonPins[i], INPUT_PULLUP);
  }
  Keyboard.begin();
}

void loop() {
  for (int i = 0; i < 4; i++) {
    int state = digitalRead(buttonPins[i]);

    if (state == LOW && lastState[i] == HIGH) {
      switch (i) {
        case 0:
          Keyboard.press(KEY_LEFT_CTRL);
          Keyboard.press('c');
          break;
        case 1:
          Keyboard.press(KEY_LEFT_CTRL);
          Keyboard.press('v');
          break;
        case 2:
          Keyboard.press(KEY_LEFT_CTRL);
          Keyboard.press('z');
          break;
        case 3:
          Keyboard.press(KEY_LEFT_ALT);
          Keyboard.press(KEY_TAB);
          break;
      }
      delay(50);
      Keyboard.releaseAll();
    }
    lastState[i] = state;
  }
}
That sketch turns your four buttons into copy, paste, undo, and alt tab, and you can swap the key combinations for whatever shortcuts you use most. The board shows up to your computer as an actual keyboard, not a serial gadget pretending to be one, which is the whole point of picking the Pro Micro for this build.
Common Problems and How I Fixed Mine
Every Pro Micro owner eventually runs into one of these. I have hit all three.
The board disappears after a bad upload. <cite index=”21-1″>The COM port shown while the board is running your sketch is often different from the port shown while the bootloader is active, so if you try to upload while pointed at the wrong port, the board can appear to vanish entirely</cite>. Bridging RST to GND briefly, then selecting the new bootloader port that appears, almost always brings it back.
Upload works once, then fails every time after. This one cost me a full afternoon. Reflashing the bootloader through an external programmer fixed it for good, and I now avoid touching the ATmega32U4 USB registers directly in my own code, since that is a common trigger.
The reset button does not seem to do anything useful. <cite index=”24-1″>Pro Micro boards ship with a modified version of the Leonardo bootloader, so when the board is reset externally it only briefly runs the bootloader, less than 750 milliseconds, before continuing on to the sketch, which is much shorter than the standard eight second wait on a stock Leonardo</cite>. If you need more time to select the port, reset twice quickly in a row.
FAQs
Is the Arduino Pro Micro the same as the Arduino Micro? No. They share the same ATmega32U4 chip and similar USB behavior, but the official Micro is a genuine Arduino product while the Pro Micro is typically a third party board based on the original SparkFun design.
Can the Arduino Pro Micro act as a keyboard or mouse? Yes. Because it has native USB support built into the chip itself, it can register with a computer as a real HID device using the Keyboard or Mouse libraries, unlike boards that rely on a separate USB to serial chip.
Why does my Pro Micro stop showing up in the Arduino IDE? This usually happens because the board is stuck on the wrong COM port between bootloader mode and sketch mode, or because the Serial Monitor was open during upload and blocked the reset signal.
What is the difference between the 3.3V and 5V Pro Micro? The 3.3V version runs the chip at a lower voltage and is meant for battery powered builds, while the 5V version is the more common choice for general projects and runs at the full 16 MHz clock speed.
Final Thoughts
The Arduino Pro Micro earned its spot on my desk because it solves one specific problem well: acting like a real USB device in a footprint smaller than a stick of gum. It is not the board for every project, but for keyboards, macro pads, and anything that needs to talk to a computer as an HID device, I have not found a better starting point.


Leave a Reply