
How to Use Bluetooth Module (HC-05) with Arduino: A Beginner-Friendly Guide
Have you ever wanted to control an Arduino project wirelessly using your smartphone? Whether it’s turning LEDs on and off, controlling a robot car, or sending sensor data to your phone, the HC-05 Bluetooth module makes it surprisingly easy.
The good news is that you don’t need advanced programming skills to get started. With just a few connections and a simple Arduino sketch, you can establish wireless communication between your Arduino board and a mobile device.
In this guide, you’ll learn how to use the Bluetooth Module (HC-05) with Arduino, how to connect it properly, upload code, pair it with your phone, and avoid common beginner mistakes. Let’s understand this step by step.
What is the HC-05 Bluetooth Module?
The HC-05 is a popular Bluetooth communication module used with Arduino and other microcontrollers. It allows wireless serial communication between devices using Bluetooth technology.
The module supports Bluetooth 2.0 and can operate as either a master or slave device. Most Arduino projects use it in slave mode, allowing smartphones or computers to connect and exchange data.
Key Features of HC-05
| Feature | Description |
|---|---|
| Communication Protocol | Bluetooth Serial |
| Operating Voltage | 3.6V – 6V |
| Default Baud Rate | 9600 bps |
| Range | Approximately 10 meters |
| Modes | Master and Slave |
| Interface | UART (Serial Communication) |
Here’s the thing: the HC-05 behaves like a wireless serial cable. Whatever data Arduino sends can be received on your phone, and vice versa.
Components Required
Before starting, gather the following components:
- Arduino Uno (or compatible board)
- HC-05 Bluetooth Module
- Jumper wires
- Breadboard (optional)
- Android smartphone with Bluetooth
- Arduino IDE installed on your computer
For this beginner project, we will control an LED using Bluetooth commands sent from a smartphone.
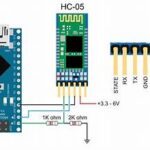
HC-05 Pin Configuration
Understanding the module pins is important before making connections.
| HC-05 Pin | Function |
|---|---|
| VCC | Power Supply |
| GND | Ground |
| TXD | Transmit Data |
| RXD | Receive Data |
| EN/KEY | AT Mode Enable |
| STATE | Connection Status |
Most beginners make this mistake: connecting TX and RX incorrectly.
Remember:
- HC-05 TX → Arduino RX
- HC-05 RX → Arduino TX
The communication lines must cross.
Connecting HC-05 with Arduino
The wiring is simple and takes only a few minutes.
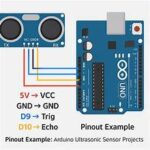
Circuit Connections
| HC-05 | Arduino Uno |
|---|---|
| VCC | 5V |
| GND | GND |
| TXD | Pin 10 |
| RXD | Pin 11 |
| LED Positive | Pin 13 |
| LED Negative | GND |
For safer communication, many makers use SoftwareSerial instead of the hardware serial pins (0 and 1). This prevents upload issues when programming the Arduino.
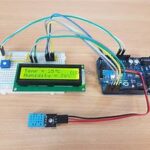
Wiring Diagram Suggestion
[Image: HC-05 connected to Arduino Uno]
Alt Text: HC-05 Bluetooth module wiring with Arduino Uno
Arduino Code for HC-05 Bluetooth Communication
Now let’s upload a simple sketch that turns an LED ON and OFF using Bluetooth commands.
Before uploading, ensure the HC-05 module is connected correctly.
#include <SoftwareSerial.h>

SoftwareSerial BT(10, 11);

char data;

void setup()
{
  pinMode(13, OUTPUT);

  BT.begin(9600);
  Serial.begin(9600);

  Serial.println("Bluetooth Ready");
}

void loop()
{
  if(BT.available())
  {
    data = BT.read();

    if(data == '1')
    {
      digitalWrite(13, HIGH);
      Serial.println("LED ON");
    }

    if(data == '0')
    {
      digitalWrite(13, LOW);
      Serial.println("LED OFF");
    }
  }
}
What Does This Code Do?
The sketch continuously listens for Bluetooth data.
When Arduino receives:
1→ LED turns ON0→ LED turns OFF
In real projects, this matters a lot because the same concept is used to control motors, relays, robots, and home automation systems.
Common Upload Tip
Disconnect the HC-05 module while uploading code if you experience upload errors. Reconnect it after the upload is complete.
Pairing HC-05 with a Smartphone
After uploading the sketch, it’s time to connect your phone.
Step 1: Power the Arduino
Connect the Arduino board to a USB cable or external power source.
The HC-05 LED should start blinking rapidly.
Step 2: Enable Bluetooth
Open Bluetooth settings on your smartphone and search for available devices.
You should see:
HC-05
Step 3: Pair the Device
Tap on HC-05 and enter the default password:
1234
If that doesn’t work, try:
0000
Step 4: Install a Bluetooth Terminal App
You can use any Bluetooth serial terminal application available on Android.
Connect to HC-05 and send:
- 1 → LED ON
- 0 → LED OFF
If everything is connected properly, the onboard LED will respond instantly.
Common Mistakes and Troubleshooting
Even simple projects can run into issues. Here are the most common problems beginners face.
HC-05 Not Showing Up
Possible causes:
- No power supply
- Loose wiring
- Bluetooth disabled on phone
Check the module LED. If it’s blinking, power is usually fine.
Unable to Pair
Try:
- Restarting Bluetooth
- Using password 1234
- Using password 0000
Data Not Received
Check:
- TX and RX connections
- Baud rate settings
- SoftwareSerial pin configuration
Upload Errors
Disconnect HC-05 during code upload if connected to hardware serial pins.
This solves many communication conflicts.
Practical Applications of HC-05 with Arduino
Once you understand the basics, you can build exciting wireless projects.
Popular Project Ideas
- Bluetooth-controlled robot car
- Smart home automation
- Wireless LED controller
- Bluetooth-based attendance system
- Sensor data monitoring
- Mobile-controlled relay switch
The HC-05 module is widely used because it’s affordable, reliable, and easy to integrate into beginner and intermediate Arduino projects.
HC-05 vs HC-06 Bluetooth Module
Many beginners get confused between HC-05 and HC-06.
| Feature | HC-05 | HC-06 |
|---|---|---|
| Master Mode | Yes | No |
| Slave Mode | Yes | Yes |
| Configuration Options | More | Limited |
| Flexibility | Higher | Lower |
| Popularity | Very High | Moderate |
If you’re starting out, the HC-05 is usually the better choice because it supports both master and slave modes.
Image Suggestions
Image 1
[Image: HC-05 Bluetooth Module Close-Up]
Alt Text: HC-05 Bluetooth module pin diagram
Image 2
[Image: Arduino and HC-05 Circuit Wiring]
Alt Text: Arduino HC-05 Bluetooth connection circuit
Image 3
[Image: Smartphone Connected to HC-05]
Alt Text: HC-05 Bluetooth pairing with Android phone
Image 4
[Image: Bluetooth-Controlled LED Project]
Alt Text: Arduino LED controlled via HC-05 Bluetooth module
Internal Linking Suggestions
- Beginner Arduino Projects
- How to Set Up Arduino IDE
- Arduino Serial Communication Explained
External Linking Suggestions
- Arduino Official Documentation
- HC-05 Bluetooth Module Datasheet
Wrapping Up
Wireless communication opens up a whole new world of Arduino projects, and the HC-05 Bluetooth module is one of the easiest ways to get started. By connecting a few wires, uploading a simple sketch, and pairing your smartphone, you can control hardware without any physical connection.
Once you’re comfortable with basic Bluetooth communication, try expanding your projects with motors, sensors, relays, or even home automation systems. The concepts you learned here form the foundation for many real-world IoT and robotics applications.
Start simple, experiment often, and don’t worry if things don’t work perfectly the first time. That’s how most makers learn.
FAQs
1. What is the default password of HC-05?
The default password is usually 1234. Some modules use 0000.
2. Can HC-05 work with iPhone?
Generally, HC-05 works best with Android devices because it uses classic Bluetooth communication.
3. What is the range of the HC-05 module?
The typical range is around 10 meters in open space.
4. Can I use HC-05 with Arduino Nano?
Yes. The HC-05 works with Arduino Uno, Nano, Mega, and most compatible boards.
5. Why is my HC-05 LED blinking continuously?
A blinking LED usually indicates the module is powered but not connected to any Bluetooth device.


Leave a Reply