
A random button is one of the most satisfying weekend builds you can do with an Arduino: press it, and a screen tells you what to eat, whose turn it is, or which chore you’re stuck with tonight. I built mine to settle “what’s for dinner” arguments with my roommate, and it ended more debates than I expected a $15 gadget to.
What You Need
- Arduino Uno (or clone)
- 16×2 LCD with I2C backpack
- One push button
- Breadboard and jumper wires
- 10k ohm resistor (skip this if you use
INPUT_PULLUPin code)
A basic starter kit covers everything except the LCD, which usually costs $4 to $7 on its own.
How an Object Randomiser Works
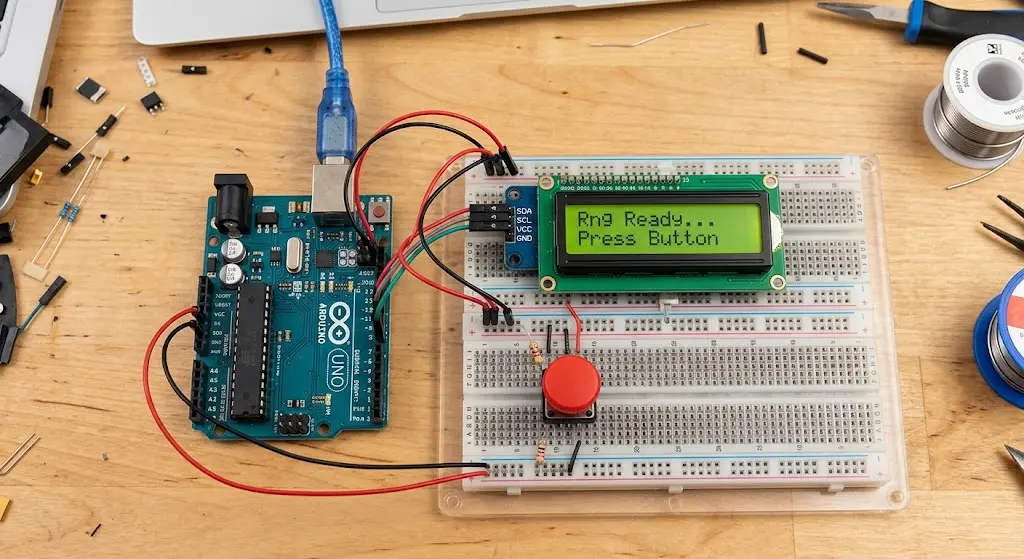
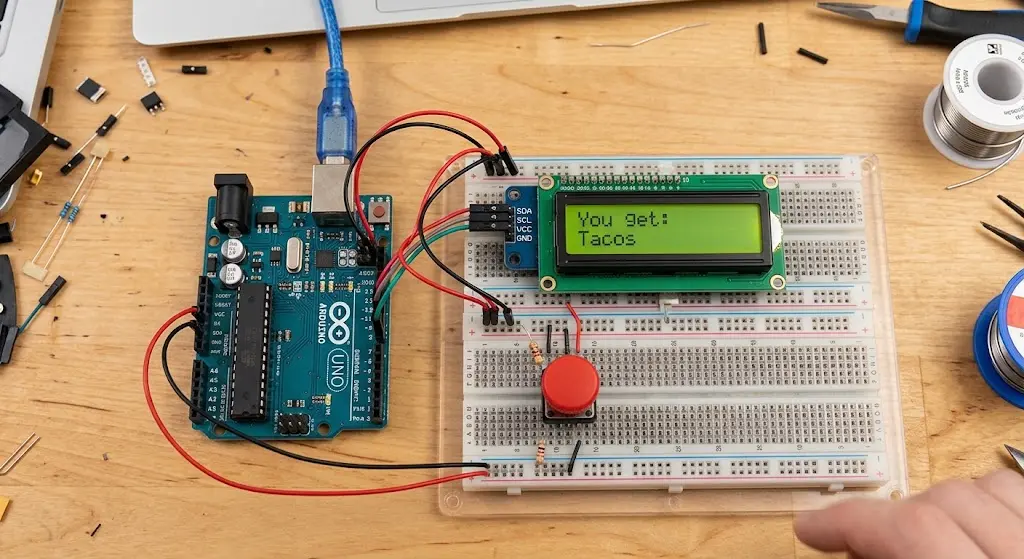
An object randomiser reads a button press, generates a random index number, and uses that number to pull one item from a list of text options you’ve written yourself, then displays it on the LCD screen. Swap the list and you’ve got a different gadget entirely, from a dinner picker to a chore wheel.
Wiring It Up
Connect the LCD’s SDA and SCL pins to the Arduino’s A4 and A5 pins. Wire the push button between digital pin 2 and ground. If you’re using INPUT_PULLUP in the code below, you don’t need an external resistor at all.
[INTERNAL LINK: link to your “how to wire an I2C LCD to Arduino” post]
The Code
Install the LiquidCrystal I2C library first, through Sketch > Include Library > Manage Libraries, then search “LiquidCrystal I2C” and install it.
cpp
#include <Wire.h>
#include <LiquidCrystal_I2C.h>

LiquidCrystal_I2C lcd(0x27, 16, 2);

int buttonPin = 2;
char *options[] = {"Pizza", "Tacos", "Ramen", "Salad", "Burgers", "Stir Fry"};
int numOptions = 6;

void setup() {
  lcd.init();
  lcd.backlight();
  pinMode(buttonPin, INPUT_PULLUP);
  randomSeed(analogRead(A0));
  lcd.print("Press for a pick");
}

void loop() {
  if (digitalRead(buttonPin) == LOW) {
    int choice = random(numOptions);
    lcd.clear();
    lcd.setCursor(0, 0);
    lcd.print("You get:");
    lcd.setCursor(0, 1);
    lcd.print(options[choice]);
    delay(2000);
    while (digitalRead(buttonPin) == LOW) {
      delay(10);
    }
  }
}
Edit the options[] array to whatever list you need, dinner choices, movie picks, or names for a raffle, and update numOptions to match how many items you added.
Key takeaway: If you skip
randomSeed(analogRead(A0)), your “random” button will pick the exact same result every single time you power the board on. This is the single most common bug in every random-button tutorial online, and it’s a one-line fix.
Why Your Random Button Might Repeat Itself
Why does my Arduino random button always give the same answer after a restart?
Arduino’s random() function is not truly random. It follows a fixed sequence unless you seed it with an unpredictable number first. Reading voltage noise off an unconnected analog pin with randomSeed(analogRead(A0)) gives you a different starting point almost every time you power up.
No LCD? Build the LED Dice Version Instead
If you don’t have an LCD on hand, the same random-button logic works with six LEDs standing in for dice faces. Wire six LEDs to pins 3 through 8, wire the button to pin 2, and light up a different LED (or combination) for each result of random(6). It’s less flexible than a text list, but it’s a genuinely fun stripped-down build for a rainy afternoon.
Beginner Mistakes to Skip
- Forgetting
randomSeed(). Your randomiser will feel broken even though it’s technically “working.” - Mismatched
numOptions. If this number is higher than your actual list, you’ll get blank results. - Wrong I2C address. Most LCD backpacks use 0x27, but some clones use 0x3F. Run an I2C scanner sketch if the screen stays blank.
- Debouncing left out. Without the
whileloop holding until release, one press can register as three.
FAQs
What does a random button do on Arduino? It reads a button press and uses that signal to trigger the random() function, which then picks one item from a list you’ve defined in code and displays it on a screen or LEDs.
Why does my random button give the same result every time? This happens when the sketch never calls randomSeed(). Add randomSeed(analogRead(A0)) in setup() to seed the sequence with real voltage noise instead of a fixed starting point.
Can I make an object randomiser without an LCD screen? Yes. Swap the LCD output for a set of LEDs and use random() to light a different one, or combination, on each button press, similar to an electronic dice.
Is Arduino’s random() function truly random? Not by default. It produces the same sequence every power cycle unless seeded with an unpredictable value, which is why randomSeed() is essential for this project.
How many items can the randomiser choose between? As many as your array and display can handle. A 16×2 LCD fits short list items cleanly, while longer text works better read out over Serial Monitor instead.
Conclusion
This build takes about 20 minutes once your LCD is wired, and the payoff is a gadget you’ll actually keep using. Wire it up, seed the randomness properly, and swap the option list for whatever decision you’re tired of making yourself.
CTA: Build it, customize your options list, and share what you used your random button to decide.
Disclaimer: This project is for fun, educational, and hobbyist use. It generates results by pseudorandom code and should not be relied on for decisions with real safety, financial, or legal consequences.





Leave a Reply